- After creating dashboard pages, access the speed menu and "View Source"...locate the table with id="TabsTable", which consists of all dashboard pages & is unique within a dashboard.
- In above table tag add style attribute, i.e. style="position: absolute; top: 90px; left: 0px;". In here the table is removed from normal workflow by specifying absoulte position. Customize other options.
- TabsTable consists of only a single row, which must be changed to accomodate all the tabs. Just add multiple row tags leaving all td tags as is. In the sample script below assume there exists two pages: 1-My Page, & 2-Page Under Construction... as highlighted in blue & My Page is active tab.
[table cellspacing="0px" cellpadding="0px" border="0" style="position: absolute; top: 90px; left: 0px;" id="TabsTable"]
[tbody]
[tr]
[td class="TabHiCell"][a class="TabHiFontLink" href="javascript:void(null)" id="HighTab" target="_self" onclick="return DashboardChangePage('saw.dll?Dashboard&_scid=e55KyvQkYnQ&PortalPath=/users/xxxxxx/_portal&Page=My\x2520Page')" title=""][span class="TabHiFont"]My Page[/span][/a][/td][/tr]
[tr]
[td class="TabDimCell"][a class="TabDimFont" href="javascript:void(null)" target="_self" onclick="return DashboardChangePage('saw.dll?Dashboard&_scid=e55KyvQkYnQ&PortalPath=/users/xxxxxx/_portal&Page=Page\x2520Under\x2520Construction...')" title=""]Page Under Construction...[/a][/td][/tr]
[/tbody]
[/table] - From the script, id="HighTab" can be removed, which does not have any side effects. Also note the classes of the two defined tabs. It is sufficice to just pass
saw.dll?Dashboard&PortalPath=xxxx&Page=yyyy as an argument to DashboardChangePage shown in the above script. I did leave as is to illustrate the example. - Place the above script in a text object on My Page. Place the text object at last.
- Now, before placing the same script on Page Under Construction... toggle all the classes & add span tag to the innerHTML text of the anchor tag. As this tab is being activated currently, the previous tab looses focus. Changes are highlighted in black i.e.
[table cellspacing="0px" cellpadding="0px" border="0" style="position: absolute; top: 90px; left: 0px;" id="TabsTable"]
[tbody]
[tr]
[td class="TabDimCell"][a class="TabDimFont" href="javascript:void(null)" id="HighTab" target="_self" onclick="return DashboardChangePage('saw.dll?Dashboard&_scid=e55KyvQkYnQ&PortalPath=/users/xxxxxx/_portal&Page=My\x2520Page')" title=""]My Page[/a][/td][/tr]
[tr]
[td class="TabHiCell"][a class="TabHiFontLink" href="javascript:void(null)" target="_self" onclick="return DashboardChangePage('saw.dll?Dashboard&_scid=e55KyvQkYnQ&PortalPath=/users/xxxxxx/_portal&Page=Page\x2520Under\x2520Construction...')" title=""][span class="TabHiFont"]Page Under Construction...[/span][/a][/td][/tr]
[/tbody]
[/table] - The final step involves hiding the already existing horizontal tabs....you do this simply by adding additional dashboard text object. Make sure you add this dashboard text object ABOVE the text object containing above scripts.
[script type="text/javascript"]
document.getElementById('TabsTable').style.display="none";
[/script] 
 Thus, all the tabs are displayed vertically. Make sure you align your dashboard objects with respect to the vertically displayed tabs. If not aligned properly, content overlaps.
- A sample screen shot of the dashboard pages are shown on the right. Note: Tabs can be formatted in anyway as per the requirement.
Monday, 27 February 2012
vertical tabs/pages in obiee dashboards
Blink Characters in OBIEE answers/dashboard
tip to make character(s) blink in obiee answers/dashboard.
use the specified CSS style in the column properties: text-decoration:blink;

use the specified CSS style in the column properties: text-decoration:blink;

Tip on mouse pointer in obiee & opacaity of image
to change the mouse pointer to any other kind like help, move pointers use the following style in "cursor:help; or cursor:move;" under column properties.

to play with opacity or blur of an image/any element use the following css styles:
opacity:0.4; (this value varies from 0.0 to 1.0) <- supported only in mozilla firefox
filter:alpha(opacity=30); (this value varies from 0 to 100) <- supported only in IE

to play with opacity or blur of an image/any element use the following css styles:
opacity:0.4; (this value varies from 0.0 to 1.0) <- supported only in mozilla firefox
filter:alpha(opacity=30); (this value varies from 0 to 100) <- supported only in IE
OBIEE 11.1.1.6 New feature : Auto-Complete Functionality for Prompts
Oracle BI EE 11.1.1.6 provides auto-complete functionality for prompts, which, when enabled, suggests and highlights matching prompt values as the user types in the prompt selection field.
Auto-complete is only available for the Choice List prompt type when the prompt designer selected the “Enable User to Type Value” option in the “New Prompt dialog”.
Note : auto-complete is not available for hierarchical prompts.
The administrator configures the auto-complete functionality to be case-sensitive or case-insensitive, and then specifies the matching level. The matching level determines how Oracle BI EE matches the column’s values to what the user types .
Step-By-Step :
System Setting:
Step1 : Navigate to the path <Middleware>\instances\instance1\config\OracleBIPresentationServicesComponent\coreapplication_obips1 and open the instanceconfig.xml file .
Add the below entry in between <ServerInstance></ServerInstance> tag.
<Prompts>
<MaxDropDownValues>256</MaxDropDownValues>
<AutoApplyDashboardPromptValues>true</AutoApplyDashboardPromptValues>
<AutoSearchPromptDialogBox>true</AutoSearchPromptDialogBox>
<AutoCompletePromptDropDowns>
<SupportAutoComplete>true</SupportAutoComplete>
<CaseInsensitive>true</CaseInsensitive>
<MatchingLevel>MatchAll</MatchingLevel>
<ResultsLimit>50</ResultsLimit>
</AutoCompletePromptDropDowns>
</Prompts>
The entry should looks like below screenshot .

Restart the OBIEE 11G Services .
1.1 : Login into Presentation services and create a prompt(In my case I am using “Sample Sales Lite” Subject Area)

Here select ‘User Input as Choice List’ and check ‘Enable user to type values’ .
Click on  to preview the prompt .
 to preview the prompt .
Type the values in the prompt and you can observe that the prompt suggests and highlights matching prompt values as the user types in the prompt selection field.

Dashboard Setting:
Step2 :How to Off Auto-Complete functionality in Dashboard?
If auto-complete is enabled for Oracle BI EE, then the dashboard designer can remove the auto-complete functionality from individual dashboards by setting the Prompts Auto-Complete field to Off in the “Dashboard Properties dialog”.
2.1 :Edit the dashboard and goto Dashboard properties .

2.2: Set Prompts Auto-Complete to Off .

Step3: How to Off Auto-Complete functionality in User Level?
3.1: Goto User -> My Account ( Here in my case user is weblogic )

3.2: Set Prompt Auto Complete to Off and click Ok

Saturday, 25 February 2012
OBIEE Freeze Pane / Headers
For OBIEE 11g, good article from Shiva-
http://shivabizint.wordpress.com/2012/05/04/freeze-column-headers-in-obiee11g/
One of the developers I have been working with, Mark Hancock, has found a solution using some custom CSS scripts.
http://shivabizint.wordpress.com/2012/05/04/freeze-column-headers-in-obiee11g/
One of the developers I have been working with, Mark Hancock, has found a solution using some custom CSS scripts.
Insert a static text object on to the dashboard, select the “Contains HTML Markup” option and enter the following text into it:
<head>
<style type=”text/css”>
div#idPivotTableParent {overflow:auto;height:600px;}
.PTRowLabelsRow td {position:relative; top: -10px}
</style>
</head>
<style type=”text/css”>
div#idPivotTableParent {overflow:auto;height:600px;}
.PTRowLabelsRow td {position:relative; top: -10px}
</style>
</head>
It works when using IE, but not Mozilla. I get a lot of hits looking for this solution, so please leave a message and let me know if this works for you too.
Thanks to BI Joe
Thanks to BI Joe
Center Dashboard Prompt
In OBIEE, the dashboard prompts are aligned to the left by default. One of the OBIEE developers I am working with asked me to find a way to center the prompts on a dashboard. This can be done by inserting the following code into a text object on the dashboard.
<head>
<style type=”text/css”>
.GFPBox{text-align: center }
.DashboardPromptViewCell {text-align: center }
</style>
</head>
<style type=”text/css”>
.GFPBox{text-align: center }
.DashboardPromptViewCell {text-align: center }
</style>
</head>
Custom URL on Dashboard
As John said, this functionality is moved to header.js. In 11G all the hand-shakes and/or defnitions are through XML. To achieve the custom URL ex: adding a
new link under help menu:
1) Edit saw.header.xml from Oracle_BI1/bifoundation/web/msgdb/common.
2) Create a new XML tag, and give some name. For ex: <resource id="kmsgHeaderCustomURL" />
3) Edit saw.header.xml from /bifoundation/OracleBIPresentationServicesComponent/coreapplication_obips1/msgdb/l_en/customMessages/uicmsgs, and give some TEXT
NAME. <WebMessage name="kmsgHeaderCustomURL"><TEXT>URL NAME</TEXT>
4) Edit header.js from '/Oracle_BI1/bifoundation/web/app/res/b_mozilla' folder.
5) Add d.push(new obips.ContextMenu.MenuOption(saw.header.getLocalizedString("kmsgHeaderCustomURL"),"",null,new obips.Callback(this,this.onCustomURL)));
6) Now define this onCustomURL function below:
saw.header.SearchBar.prototype.onCustomURL=function(){saw.header.Menubar.getManager().hidePopupPanel();obips.launcher.launchNewWindow("http://oracle.com","_b
lank")}
7) Save and re-deploy.
Best advice is to create customMessage folder and making these changes. For ex: Instead of chaning it in ORACLE_BI1, create a new "customMessages" folder if
doesn't exist under /BI_Instance/bifoundation/OracleBIPresentationServicesComponent/coreapplication_obips1/msgdb/ and copy the step (1) saw.header.xml to
this folder and make the necessary changes. Now for step (2) - create a new folder
/BI_Instance/bifoundation/OracleBIPresentationServicesComponent/coreapplication_obips1/msgdb/l_en/customMessages and do the the same.
If you want to avoid step (7), then manually copy the changed header.js to
/user_projects/domains/BIfoundation/servers/bi_server1/tmp/_WL_user/analytics_11.1.1/$RANDOMFOLDERNAME$/war/res/b_mozilla and bounce the services.
For ref: Please also refer to this thread -> https://forums.oracle.com/forums/thread.jspa?threadID=2252212
OBIEE 11g Removing Dashboard Links
The following are the links that needs to go for the dashboard users.
1) Home
2) Catalog
3) New
4) Open
I have found that saw.header.xml file located in
C:\bi11gbeta2\Oracle_BI1\bifoundation\web\app\res\b_mozilla\common folder has the following tags :
<resource id="kmsgHeaderHome" />
<resource id="kmsgHeaderNew" />
<resource id="kmsgHeaderOpen" />
<resource id="kmsgHeaderDashboard" />
<resource id="kmsgHeaderCatalogPage" />
<resource id="kmsgHeaderOpenCatalogDialog" />
And saw.header.xml file located in
C:\bi11gbeta2\Oracle_BI1\bifoundation\web\msgdb\l_en\messages\uicmsgs folder has the text for the above message tags.
For example :
<WebMessage name="kmsgHeaderHome"><TEXT>Home</TEXT></WebMessage>
<WebMessage name="kmsgHeaderOpenCatalogDialog"><TEXT>Open...</TEXT></WebMessage>
So replacing or modifying above message tags will change the caption on UI -however this cannot be done user or group specific..Once change is done it will
be applicable for all users.
Also header.js located in C:\OBIEE11G\Oracle_BI1\bifoundation\web\app\res\b_mozilla folder where the header messages are referenced -this may need to be
modified for removing the links (not just tesxt)
Note that you need to restart all services once you make any changes to xml files
for reference...
http://www.oracle.com/technetwork/middleware/bi/customizing-oracle-biee-11g-176387.pdf
your file displays like this.
<WebMessage name="kmsgHeaderHome"><TEXT>Home</TEXT></WebMessage>
just you delete Home from this tag.
Example:
<WebMessage name="kmsgHeaderHome"><TEXT> </TEXT></WebMessage>
IMP:Dont delete full code.
now you cant see Home on your Dashboard.
check and confirm.
Friday, 24 February 2012
OBIEE 11.1.1.6.0 New Features
New features of OBIEE 11.1.1.6.0:
Auto-Complete Functionality for Prompts: This release contains auto-complete functionality for prompts. When enabled by the administrator, auto-complete suggests and highlights matching prompt values as the user types in the prompt selection field. Auto-complete can be excluded or included on dashboards, and users can turn auto-complete off for their accounts.
Optional Apply and Reset Buttons for Prompts: You can show or hide a prompt’s apply and reset buttons. If the designer chooses to hide the apply button, then the specified prompt value is immediately applied to the dashboard or analysis.
Miscellaneous Prompts Enhancements: The following prompts enhancements were added:
The prompt Reset button now provides three reset options: Reset to last applied values, Reset to default values, and Clear All.
- In the “Dashboard builder”, the dashboard designer can add the Edit and Copy links to the dashboard’s prompts. These links will display at run time, and users with the proper privileges can click them to edit the prompt or copy the prompt’s link.
- The row-based layout prompt option was added to the prompt editor’s “Definition pane”. As a result, you can now specify a row-based or column-based layout for your prompts.
Favorites: This release introduces Favorites, which allows you to bookmark as favorites the catalog objects that you view regularly or want to view again at another time. You can use the “Manage Favorites dialog” to organize your favorites into categories, and you can view your favorites list and open your favorite objects from the global header’s Favorites menu.
Customizable Global Header and Get Started…. Section of the Home Page
The order of the links on the global header can now be customized, and links to external locations can be added to the global header. The Get Started… section of the home page can also be customized to meet the informational needs of the users. The Administrator implements these customizations and when users log into Oracle BI EE, they will see these customizations.
Oracle BI Client Installer Option Added to the Home Page
A link to the Oracle BI Client Installer has been added to the Download BI Desktop Tools option, which is located in the Getting Started… section of the Home Page. User’s with the proper privilege can click this option to download and install the Business Intelligence Administration Tool and the Oracle Business Intelligence Job Manager.
Integrated Full-Text Search Capabilities
This release provides a fully integrated full-text search. This search is available after the administrator integrates Oracle BI Enterprise Edition with Oracle Secure Enterprise Search. This method of searching allows the user to find objects by searching on their attributes such as author and column name.
Ability to Set Accessibility Mode in the Sign In Page
In this release, the “Sign In page” has been enhanced to include the Accessibility
Mode box, which allows you to specify whether you want content for Oracle BI EE to be rendered in a browser in a way that facilitates the use of a screen reader.
Enhancement to Oracle Scorecard and Strategy Management
This release includes the addition of a contribution wheel diagram to a strategy tree, which allows you to view an objective and its supporting child objectives and KPIs hierarchically in a circular diagram.
Oracle Business Intelligence Mobile
Oracle Business Intelligence Mobile is now documented in Oracle Fusion Middleware
User’s Guide for Oracle Business Intelligence Mobile.
Enhancements to Map Views
In this release, map views have been enhanced in various ways:
- You can include non-BI layers on a map view.
- You can use the marquee zoom feature to zoom into a specific area of the map View.
Enhancements to Selections
- The release includes the following enhancement to selections:
- The ability to include selected members in hierarchy selections steps that are based on family relationships.
- The addition of Siblings of and Leaves of options in family relationships.
- If the content designer adds a selection step that includes a condition with a qualified data reference (QDR), the QDR now displays in the Selection Steps pane.
- The “All X values where Y = values” condition type was added. This condition type is available for attribute columns and hierarchical columns. The Column field was added to the New Condition Step dialog for this condition type.
Enhancements to Views
This release includes the following enhancements to views:
- The ability to rename views and compound layouts.
- The Selection Steps view was added. This view when added to an analysis, displays the selection steps in effect for the analysis.
Enhancements to Tables and Pivot Tables
In this release, tables and pivot tables have been enhanced to allow you to:
- Select the measure on which to sort a column in a pivot table.
- Specify how columns that are added to an analysis from the “Analysis editor:
- Criteria tab” after displaying the analysis results are handled.
- Additional interactions on the right-click menu, for example, Include column,
- Show Running Sum, interactions for selection steps, and so on
- The ability to specify which interactions (for example, Drill) are available when you right-click in an analysis or a dashboard at run time.
BI Composer Enhancements
This release includes the following enhancements to BI Composer:
- The ability to use BI Composer in regular mode as well accessibility mode. (In the previous release, BI Composer was available only in accessibility mode.
- The ability to perform the following tasks when creating an analysis using BI
Composer:
- Add or remove subject areas from which to select columns
- Specify column interactions, such as drill
- Specify whether columns are hidden
- Rename columns
- Specify column formulas
Thursday, 23 February 2012
Customized Message for No result On all Reports
The default messages displayed when a report returns no data are in:
BI_HOME\web\msgdb\<language>\messages\viewme ssages.xml
You can override these messages in by creating a custommessages.xml file in BI_HOME\web\mesdb\customMessages
For example, the following changes the default 'No Results' message:
<?xml version="1.0" encoding="utf-8"?>
<WebMessageTables>
<WebMessageTable system="Custom Messages">
<!-- Change No Results message -->
<WebMessage name="kmsgEVCNoRowsTitle"><HTML> ;No Data Found!</HTML></WebMessage>
</WebMessageTable>
</WebMessageTables>
Refer below for more information-
http://docs.oracle.com/cd/E14571_01/bi.1111/e10541/webuicustom.htm
Comments are always welcome...
BI_HOME\web\msgdb\<language>\messages\viewme ssages.xml
You can override these messages in by creating a custommessages.xml file in BI_HOME\web\mesdb\customMessages
For example, the following changes the default 'No Results' message:
<?xml version="1.0" encoding="utf-8"?>
<WebMessageTables>
<WebMessageTable system="Custom Messages">
<!-- Change No Results message -->
<WebMessage name="kmsgEVCNoRowsTitle"><HTML> ;No Data Found!</HTML></WebMessage>
</WebMessageTable>
</WebMessageTables>
Refer below for more information-
http://docs.oracle.com/cd/E14571_01/bi.1111/e10541/webuicustom.htm
| logoncontrolmessages.xml | Logon Page |
| dashboardtemplates.xml | Dashboard page |
Comments are always welcome...
Wednesday, 22 February 2012
Adding Custom URLs to the Dashboard
We will be looking at another simple feature today. Generally, when we give BI EE access to the end users, it is always good if the dashboard contains the frequently accessed URLs or the intranet URLs that are common within the organization. For example, some users might want to have a Google link on the top of the dashboard which should be available in whichever component of BI EE that they go into. If you are not sure what i mean, look at the screenshot below.
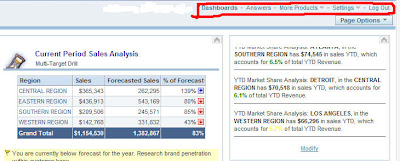
If you notice, generally we only have Dashboards, Answers, More Products, Settings(if you have privilege) and Logout URLs in everyscreen. What if the organization policy is to have the company home URL and other commonly used URLs to be part of the same set of URLs. So, our aim today is to look at a simple way of adding some static URLs like Oracle Home page and Google to the other set of URLs. The steps are listed below
1. Go to {OracleBI}\web\msgdb\messages and copy the file commonuitemplates.xml to {OracleBIData}\web\msgdb\customMessages (if you dont have this folder create a new one). Now open this file in a text editor.
2. Search for the web message kuiMainBarActionsTable and add the below listed lines immediately after the tr tag.
<td class=”DashBarProductCell”><a href=”http://oracle.com” target=”_blank”>Oracle Home</a></td>
<td class=”@{classPrefix}Sep”>-</td>
<td class=”DashBarProductCell”><a href=”http://google.com” target=”_blank”>Google</a></td>
<td class=”@{classPrefix}Sep”>-</td>
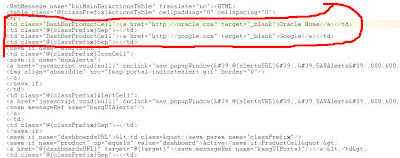
So, what this does is it adds 2 new URLs to the existing layout. But remember this will affect the UI for all the users.
3. Save the file and restart presentation services. Now, you should have these 2 new links added to the dashboard.
This can be useful if you dont have any other option but to add the links for all the users.
For Email-
In step 2, you can add the below HTML immediately after the <tr> tag.
<td class="@{classPrefix}ActionCell"><a href="mailto:groupname@mycompany.com" target="_blank">Mail Link</a></td><td class="@{classPrefix}Sep">-</td>
<td class="@{classPrefix}ActionCell"><a href="mailto:groupname@mycompany.com" target="_blank">Mail Link</a></td><td class="@{classPrefix}Sep">-</td>
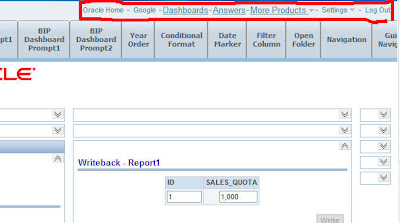
Dymanic Title - Getting value of a CELL
- In the narrative view, check the option 'Contains HTML Markup'. Then for different sections specify the values as mentioned below:
prefix: <script type="text/javascript"> var cnt=1;
Narrative: if(cnt==5)document.write('@3');cnt=cnt+1;
postfix: </script>
- While you are editing in narrative view, ensure you uncheck the 'Display Results' checkbox.
- Now add this view to your compound layout. You should be able to see value in 3rd column 5th row. Here in cnt==5, 5 is the row number which we want to display.
- What this piece of code does is that it sets a counter equivalent to the row number and if the row number equals the value specified it will display the value, else it won't.
This e.g. is for 10g. You can try repeating the same steps to achieve this in 11g too.
Kudos-HM
Download to excel with Disclaimer Text
- Add a static text view at the end of the report (last view in the compound layout).
- In the static text view, inlcude the below text and check the 'Conatains HTML Markup' option.
<span style="display:none">Disclaimer Text</span>
- Here the text between the span tags will not be displayed when the report is viewed in Answers/Dashboard. However, when you download the report in excel, it would be visible.
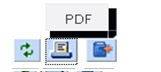
Removing HTML /PDF Print Options in Dashboard
Oracle Interactive Dashboard provides print options in HTML and PDF output format by default. The available output format options can be customized to reflect across all dashboard or specific to a particular dashboard page

Customization to reflect across all Dashboards
Remove HTML Print Option
1. Navigate to \web\msgdb\messages\controlmessages.xml
2. To remove the HTML print option from the printer menu, comment the
below code from the controlmessages.xml
2. To remove the HTML print option from the printer menu, comment the
below code from the controlmessages.xml

Customization to reflect on a specific Dashboard Page
Remove PDF Print Option
Remove PDF Print Option
1. Edit Dashboard
2. Add a Text box object into the Dashboard Page
3. Add the following script to the Text Properties
<script type="text/javascript">
function RemovePDFOption() {
var tds = document.getElementsByTagName('span');
for (var td = 0; td < tds.length; td++) {
if (tds[td].className != 'DashboardFormatLinks') {
continue;
}
//alert(tds[td].innerHTML);
var tHTML = tds[td].innerHTML;
tHTML = tHTML.replace("PDF","");
//alert(tHTML);
tds[td].innerHTML = tHTML;
}
}
window.onload = RemovePDFOption;
</script>
4. Check the option " Contains HTML Markup "
5. Save the changes and view the Dashboard Page, the PDF output format for Printer is hidden for that specific Dashboard Page alone


Remove HTML Print Option
1. Edit Dashboard
2. Add a Text box object into the Dashboard Page
3. Add the following script to the Text Properties
<script type="text/javascript">
function RemoveHTMLOption() {
var tds = document.getElementsByTagName('span');
for (var td = 0; td < tds.length; td++) {
if (tds[td].className != 'DashboardFormatLinks') {
continue;
}
//alert(tds[td].innerHTML);
var tHTML = tds[td].innerHTML;
tHTML = tHTML.replace("HTML","");
//alert(tHTML);
tds[td].innerHTML = tHTML;
}
}
window.onload = RemoveHTMLOption;
</script>
4. Check the option " Contains HTML Markup "
5. Save the changes and view the Dashboard Page, the HTML output format for Printer is hidden for that specific Dashboard Page alone

Thanks to my colleague Mohan who shared the details on customizing the output format option across all Dashboard
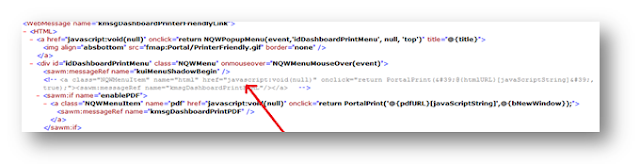
How to hide Refresh, Printer Friendly & Add Briefing Book Icons Specific to a Dashboard Page
1. Edit Dashboard
2. Add a Text box object into the Dashboard Page
3. Add the following script to the Text Properties
<script type="text/javascript">
function RemoveDefaults() {
var tds = document.getElementsByTagName('span');
for (var td = 0; td < tds.length; td++) {
if (tds[td].className != 'DashboardFormatLinks') {
continue;
}
//alert(tds[td].innerHTML);
tds[td].innerHTML = " ";
}
}
window.onload = RemoveDefaults;
</script>
function RemoveDefaults() {
var tds = document.getElementsByTagName('span');
for (var td = 0; td < tds.length; td++) {
if (tds[td].className != 'DashboardFormatLinks') {
continue;
}
//alert(tds[td].innerHTML);
tds[td].innerHTML = " ";
}
}
window.onload = RemoveDefaults;
</script>
4. Check the option " Contains HTML Markup "
5. Save the changes and view the Dashboard Page, the icons for Refresh, Printer Friendly & Add Briefing Book Options are hidden for that specific Dashboard Page alone
DashboardFormatLinks - Refresh, Printer Friendly & Add Briefing Book
Dashboard format Links are controlled by the configuration file controlmessages.xml located in the path < OracleBI>\web\msgdb\messages.
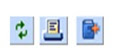
Move the file to the location < OracleBI>\web\msgdb\customMessages, the format links are controlled by the propertykmsgDashboardAlternateFormats.

Parameter Options
1 -> Refresh
2 -> Printer Friendly
3 -> Add to Briefing Book
2 -> Printer Friendly
3 -> Add to Briefing Book
To hide the format links in the Dashboard page, comment the corresponding param code. For example to hide the Printer Friendly options across all Dashboards make the changes as below

Restart Presentation services for the changes to reflect

Subscribe to:
Posts (Atom)