Friday 29 June 2012

Thousand separator in Narrative View

To display the thousand separator comma for the measure values in the Narrative view Bill suggested to use the HTML format.
https://forums.oracle.com/forums/thread.jspa?threadID=2393458&tstart=15

Use the below format in the narrative view with HTML enabled.

<td id="Format" style ="vertical-align: top; text-align: right; width: 150px;"> @2 <br>
</td>
<script language="javascript" type="text/javascript">
document.getElementById("Format").innerHTML=number_format(@2, 2, '.',',');;
</script>

@2 is the position of the fact measure column.

And also as per Nico-
This is a bug:
NLS:NARRATIVE VIEW DOES NOT USE CRITERIA DATA FORMAT
https://support.oracle.com/CSP/main/article?cmd=show&type=BUG&id=13791979
And it's fixed in the version 11.1.1.7.0 ..

Comments are always welcome...

Pop Up/ New Window

When the user needs to have a new google search window on click on the value and then search the value by default.
We can have the customized html code in the column formula and change the Data format of the column to HTML.
'<a target="_blank" href="http://www.google.com/search?hl=en&q=' ||col_name||'&btnG=Google+Search">'||col_name|| '</a>'


After clicking on the value-


Also follow the below link for opening to a new window within the report-
http://shahin-obiee.blogspot.in/2012/05/normal-0-false-false-false-en-us-x-none.html
Comments are always welcome...

Data Level Security


I know I am re-inventing the wheel for Data level security. But I want to show the obiee beginners a simple guide to implement the same. Hope people out there struggling to implement Data level security will get a hint to build it.

Data Level security is implemented in the case when the user logging in views the data which he/ she has the access to. This includes to include a system session variable 'USER'to capture the user's logging credentials and apply it to the reports query.

I am having three tables for serving their purpose.
1. Dimension Table - DIM2
2. Fact Table  - FACT1
3. Security Table -SECURITY_1

Data present in the above tables is shown below-


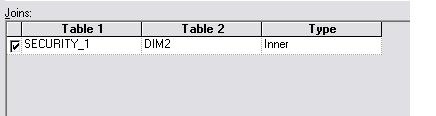
Next we need to import the three tables in the RPD and do the below joins-


Joins with Dimension and Security table in physical Layer

"DIM2"."COUNTRYID" = "SECURITY_1"."COUNTRYID"

Joins with Fact and Security table in physical Layer

"FACT1"."EMPID" = "SECURITY_1"."EMPID"

Joins with Fact and Security table in physical Layer

"DIM2"."COUNTRYID" ="FACT1"."COUNTRY_ID"


In the BMM layer for the dimension table we need to make the below changes. This change is used to apply when the user selects only the dimension column. So that the values which he/ she has the access will be shown after making the joins with the security table. For example- On clicking of the Prompt values.


And the below change in the Content Tab -where clause


In the BMM layer for the fact table we need to make the below changes. Data will be restricted after making joins with the security table and joins with the dimension  table. You can try removing the joins with the dimension and security tables which is not mandatory, since we are joining with the fact and security tables.


And the below change in the Content Tab -where clause


Now its time to view our reports in answers. When the user logs in with 100 as empid then the user is allowed to view only his/ her data.


With the Fact column-


When the user with 200 empid logs in-


Prompt value shown for the user with empid 200

Below are the queries generated-

For Dimension Security

WITH SAWITH0 AS
  (SELECT DISTINCT T222731.COUNTRY_NAME AS c1
  FROM OBIEE_DBA.SECURITY_1 T222728,
    OBIEE_DBA.DIM2 T222731
  WHERE ( T222728.EMPID = '100'
  AND T222728.COUNTRYID = T222731.COUNTRYID )
  )
SELECT DISTINCT 0 AS c1, D1.c1 AS c2 FROM SAWITH0 D1 ORDER BY c2

With Fact Dimension columns with Security tables joins. With user with login id as 100

WITH SAWITH0 AS
  (SELECT DISTINCT T222731.COUNTRY_NAME AS c1,
    T222734.SALARY                      AS c2
  FROM OBIEE_DBA.SECURITY_1 T222728,
    OBIEE_DBA.DIM2 T222731,
    OBIEE_DBA.FACT1 T222734
  WHERE ( T222728.EMPID = T222734.EMPID
  AND T222728.EMPID     = '100'
  AND T222728.COUNTRYID = T222731.COUNTRYID
  AND T222731.COUNTRYID = T222734.COUNTRY_ID )
  )
SELECT DISTINCT 0 AS c1,
  D1.c1           AS c2,
  D1.c2           AS c3
FROM SAWITH0 D1
ORDER BY c2,
  c3

With user with login id as 200

WITH SAWITH0 AS
  (SELECT DISTINCT T222731.COUNTRY_NAME AS c1,
    T222734.SALARY                      AS c2
  FROM OBIEE_DBA.SECURITY_1 T222728,
    OBIEE_DBA.DIM2 T222731,
    OBIEE_DBA.FACT1 T222734
  WHERE ( T222728.EMPID = T222734.EMPID
  AND T222728.EMPID     = '200'
  AND T222728.COUNTRYID = T222731.COUNTRYID
  AND T222731.COUNTRYID = T222734.COUNTRY_ID )
  )
SELECT DISTINCT 0 AS c1,
  D1.c1           AS c2,
  D1.c2           AS c3
FROM SAWITH0 D1
ORDER BY c2,
  c3


Comments are always welcome...

Thursday 28 June 2012

Hierarchy in Answers

Hierarchies can be created in the RPD and viewed in the answer report. Hierarchies plays an important role in OBIEE to see the drill down hierarchy order. In RPD hierarchy is created according to the requirement and viewed accordingly in the answers.
Here in my case, I will show you the case of creating a hierarchy based report from the answers directly. But remember this is not a hierarchy columns created from the RPD Hierarchy.
And you need to remember that the values into the column should be in the order of the hierarchy that is to be displayed on the page.
NOTE- Only dimension columns seems to work fine without fact columns.
So, this structure can be used to display a certain hierarchy level without the means of fact columns.

In the report, drag the dimension column which contains the values to be displayed in hierarchial order.

Add a second dummy column in the report with the HTML Data format enabled. Add the mentioned column formula to stimulate the required changes using HTML. I am adding a default RED color to display behind the word.


And view the report and save it.


Comments are Welcome..

Wednesday 27 June 2012

OBIEE 11g- Action Link Menu

OBIEE 11g provides a good feature to show the links in drop down. This option can come into picture when we are navigating to a separate report/page/web pages etc.
This reduces the dashboard complexity by displaying more links on the page and consuming the space in the page. We can open the new analysis in the same window or to a new window.
So lets get into a simple Action Link Menu creation.

In the dashboard page, edit and drag the Action Link Menu object into the dashboard.

You can find the properties to add to the Action Link Menu


Clicking on the Green (+) symbol will give the number of separate links to be navigated.


I am preferring to provide Google and OTN navigation from these links.


Save the page settings and click on the Links Menu and you will find the sub menus attached.


Tuesday 26 June 2012

Time to move to OBIEE 11g

Time to move to OBIEE 11g... Yes, browsing through found a link guiding me through the support extended by Oracle Team to its products.
Oracle has established itself strongly on many products and continuing to do so. The support extended to its products is mentioned in the pdf doc mentioned below-
http://www.oracle.com/us/support/library/lifetime-support-middleware-069163.pdf
OBIEE related support is provided in the 14th page and is useful to all the teams running their application on the respective versions. So after checking the Premier support period for OBIEE 10g, we need to be cautious and start with the plans to upgrade the existing OBIEE 10g versions to OBIEE 11g version.

Providing a screenshot of the 14th page for your information-


People move on....

Monday 25 June 2012

Flat Files Import


Gone through blogs to view if we can connect to the notepad data from OBIEE. And of course, many blogs threw light on the procedure. I would like to elaborate more on the concept here in this blog. Data loading from notepad is very rare but good to know the process of importing the data and its configuration settings.
I am having the below shown data in the notepad. And rememeber it is tab indented. So you need to be careful while entering your data.


As you all know, we need to have a DSN connection configured to have the notepad data imported to RPD. Creating a System DSN with Microsoft Text Driver.


Select Directory and save the path from where you need to import the data from the notepad.
You need to click on the 'Define Format'.


Click on the 'Guess'button. The setting will try to find the appropriate setting of the data which is retrieved from the notepad data.


You can click on the values and modify or remove the columns according to your requirements.
Once all the above steps are complete then click on OK and close the connection settings.

In the RPD import the notepad file by selecting the appropriate DSN entry made earlier. And also give the name of DSN entry as the username.


And view the data. And data pops up with beauty


Multiple Measure Selection For A Graph- INDEXCOL

One of my colleague wanted to display the measure columns in the graph, but not all the measures at the same time. User will select the name of the measure columns to select from the prompt. And the measure which the user selects should be painted on the graph.
So, going forward I preferred to give the option to select the number of measures in check box (thanks to OBIEE 11g to provide the check box option as default).

First we need to create the prompt with the check box.  I am considering to have two measure columns. For our requirement we need to display the first measure prompt as the default selection. So including the default selection as 1.


Remember when you are passing the presentation variable values then it accepts the number data type in this case to paint on the graph. So I am passing 1 for the first prompt and 2 for the second prompt.


In the report I am pulling three columns ie., first is the dimension column, second is the first measure column and third is the second measure column.


In the column formula we can write case statements, but I am preferring to put down the formula using the INDEXCOL function.

Similarily I am using the INDEXCOL function in the second column formula.


Check the results in the compound layout and yes both the measure columns doesnt produce results and is expected.


Save and view the report in the dashboard.

By default the 1st prompt measure column is selected.


When we select the second prompt measure column then both the measure columns display with beauty.

Friday 22 June 2012

OBIEE 11g feature- Adding Multiple Subject Areas

When people migrate from OBIEE 10g to OBIEE 11g, they are keen to know some of the features which have been updated or added new to OBIEE 11g.
One of the feature which gets featured in OBIEE 11g is the access to add Multiple Subject Areas into the criteria. Developers using OBIEE 10g for a quite long time can see that when they are into a single subject area building the reports then they can only access the columns from that subject area.

     But OBIEE 11g allows the feature to select multiple subject areas while creating the reports.  So that means we can add columns from multiple tables from multiple subject areas. You can find the option to add/ remove the subject area in the below location.

We will try to built a report with columns pulled from multiple subject areas.

First I try to pull the columns from the first subject area.


Once the subject area is displayed you need to check the required subject area and that gets added to the the current subject area. Then I click on the add/remove subject areas (+) marked in green color. And check the required subject area. As you can see that the adding/removing of the subject area is based on the tick symbol in the check box. I have selected the second subject area to append after the first subject area.

I then start to pull other dimension and facts from the new subject area.
Then we try to built the reports with the columns coming from multiple subject areas.


And the result comes as anticipated. Good to use whenever such requirements comes into picture.


Below is the XML generated in the Advanced Tab.

<saw:criteria xsi:type="saw:simpleCriteria" subjectArea="&quot;Sample Sales Lite&quot;">
      <saw:columns>
         <saw:column xsi:type="saw:regularColumn" columnID="c88ddbefa9ec58262">
            <saw:columnFormula>
               <sawx:expr xsi:type="sawx:sqlExpression">"Time"."Per Name Year"</sawx:expr></saw:columnFormula></saw:column>
         <saw:column xsi:type="saw:regularColumn" columnID="cf380dda95c2aeed7">
            <saw:columnFormula>
               <sawx:expr xsi:type="sawx:sqlExpression">"Sample Targets Lite"."Time"."Per Name Year"</sawx:expr></saw:columnFormula></saw:column>
         <saw:column xsi:type="saw:regularColumn" columnID="cb786b625d3124272">
            <saw:columnFormula>
               <sawx:expr xsi:type="sawx:sqlExpression">"Base Facts"."Revenue"</sawx:expr></saw:columnFormula></saw:column>
         <saw:column xsi:type="saw:regularColumn" columnID="cd5f25ab19e0afca7">
            <saw:columnFormula>
               <sawx:expr xsi:type="sawx:sqlExpression">"Sample Targets Lite"."Base Facts"."Target Revenue"</sawx:expr></saw:columnFormula></saw:column></saw:columns></saw:criteria>


Line Break in the column

We need to display the text inside the column formula with a line break to show the data broken with horizontal pieces.
So as always we can call HTML into rescue for such situation. And also to mention OTN serves good to come up with different ideas meeting the requirements.

We can replace the words blank spaces with a <br> tag like the one shown below-


Replace('Good Day To People',' ','<br>')

Result for the above code in the column formula-

The above piece of code holds good in the situtation where there is a line break after every space.

Supposing if we need to have a line break after few sets of words then the code should be like the below-

Replace('Good Day* To People Out* There','* ','<br>')


And the last piece of code without the Replace statement-

'Good'||'<br>'||'Day'

I used the below code to display the values as

'Good'||'<br>'||'Day'||'---->'||"Products"."Product"


NOTE- Please dont forget to change the Data format of the column in the column properties to 'HTML'


Tuesday 19 June 2012

OBIEE Version Displaying

Again back with a small information to you all.

When the user needs to view an information on the OBIEE installed version on the system. Of course, we have other ways to find out this information in more easier way :). But still if the user needs the information to be displayed on the starting/ first/ initial dashboard pages when the user logs in.

OBIEE provides a variable which has this information stored and our job is to use it accordingly.We can provide a static text in the report (if the message needs to be report specific) or we can have the static text on the dashboard.

I used the below format as per my requirement.

"Currently the system has OBIEE Version [u][b]-@{system.productVersion} [/b][/u] installed"

And the result-


Pivot Table Indent formatting

In the OTN forum https://forums.oracle.com/forums/thread.jspa?threadID=2401883&tstart=15
many times people ask for formatting the indent type of pivot tables.
Yes, in OBIEE 11g it has become a bit odd to look to the pivot table formats. User's also start complaining on the indent type color and want to get rid of the default feature provided.
We can modify the xml contents for this bug, but in case when the reports are confined to specific dashboards then we need to format the reports individually or the dashboard reports individually.

In my below post I am trying to restrict the indent color type of pivot table within the report inside the compound layout.

Below is the code using javascript to do-

<script type="text/javascript">
var tds = document.getElementsByTagName('td');
var lCSS = new Array();
for(var td=0;td<tds.length;td++){
if( tds[td].className != 'PTCC'){
continue;
}
tds[td].style.backgroundColor="#FFFFFF";
lCSS.push(tds[td].innerHTML);
}
for(var len =0; len < lCSS.length; len++){
}
</script>

#FFFFFF is the color code and change using your own code

What I am preferring is a simple one line code to do the magic!!!.
You need to have a simple static text and of course HTML check box enabled and have the below piece of simple code.

<style>.PTCC {background-color:white;border-top:white;border-bottom:white;border-left:white;border-right:white}</style>

And use the static text in the compound layout of the report. The above code will change the properties of the pivot table indent to white making it appear as if it has disappeared from the pivot table.
View the below piece of code in the dashboard.


Result-

NOTE * -Data is made as white to hide the information in the screenshot above

Saturday 16 June 2012

Moving the Report Links

In the OTN forum below-
https://forums.oracle.com/forums/thread.jspa?threadID=2268439&tstart=0
got the requirement that we need to move the report links at the top of the page. So which means if the report is too large then the user doesn't need to scroll to the bottom of the report to download or edit the report.
This gives a feasibility to the users to download the report at the first sight of the page and yes you are going to get a good impression too.
So as my previous post says for editing the Report links-

http://obiee10grevisited.blogspot.in/2012/06/background-color-for-report-links.html

Before the changes-


All we need to do is to use the static text in the dashboard and of course HTML enabled and use the below code in the static text.

<style>.ResultLinksCell { background-color: Red; border-top: white; border-left: Black;
position:relative;
top:-150px;
left:-350px;
}</style>


Result looks good and satisfying.